How to Use Claude Code to Add Form Validation with Zod
Claude Code can add Zod form validation to an existing project in a single session: it reads your form components, generates type-safe schemas, wires up error messages, and runs your test suite before handing control back to you. This guide is for TypeScript developers who want to stop writing boilerplate and keep shipping. The main trade-off: Claude Code burns tokens quickly on large codebases, so watch your usage limits or you risk a 5-hour lockout mid-PR.
- Zod is the most widely adopted TypeScript-first schema library, with over 35 million weekly npm downloads.
- Claude Code can read, edit, and test multiple files in one prompt, reducing the back-and-forth of manual validation wiring.
- A full form validation task (schema + error UI + tests) typically takes 3-6 Claude Code turns, depending on form complexity.
What is Zod and why use it for form validation?
Zod is a TypeScript schema declaration and validation library. Unlike Yup or Joi, Zod infers static TypeScript types directly from your schema, so your runtime validation and your compile-time types stay in sync automatically. This makes it the go-to pairing for forms built with React Hook Form via the @hookform/resolvers package, and equally effective with Next.js Server Actions, tRPC inputs, and plain API routes.
The practical benefit: you define your validation rules once in a Zod schema, and TypeScript propagates those constraints everywhere the data flows. Claude Code understands this pattern well and can apply it consistently across your project without you having to repeat context.
How to prompt Claude Code to add Zod validation
The most effective approach is a direct, scoped prompt that tells Claude Code exactly what form to target, which framework you are using, and what behavior you expect on error. Vague prompts produce generic output that needs heavy editing.
Step 1: Open Claude Code in your project root
Navigate to your project directory and launch Claude Code from the terminal:
cd your-project
claude
Claude Code will index your project structure. For large monorepos, point it at the relevant package directory to keep the context window lean and your token spend predictable.
Step 2: Install Zod and the resolver (if not already present)
Ask Claude Code to handle installation and check for conflicts:
Install zod and @hookform/resolvers. Check package.json first and skip if already present. Use the existing package manager (npm/yarn/pnpm).
Claude Code will read package.json, detect your package manager from the lockfile, and run the correct install command. This avoids the common mistake of mixing package managers in a project.
Step 3: Generate the Zod schema for your form
Give Claude Code a concrete target:
Read src/components/SignupForm.tsx. Create a Zod schema for all its fields. Add min/max length, email format, and password confirmation match. Export the schema and its inferred TypeScript type from a new file src/schemas/signup.ts.
Claude Code will parse your existing form fields and build a schema that matches. Keeping schemas in a dedicated /schemas directory (as instructed here) makes them easy to reuse in API route handlers and server actions.
Step 4: Wire React Hook Form to the Zod resolver
Once the schema file exists, ask Claude Code to integrate it:
Update SignupForm.tsx to use React Hook Form with zodResolver from @hookform/resolvers/zod. Import the schema from src/schemas/signup.ts. Display inline field errors below each input using formState.errors.
Claude Code will rewrite the form component, replacing any existing manual validation logic with the resolver pattern. It will preserve your existing JSX structure and only touch the validation-related code.
Step 5: Handle server-side validation errors
Client-side validation is not enough. Ask Claude Code to add server error passthrough:
Add a root-level error display to SignupForm.tsx that shows server errors returned from the API (e.g., "Email already taken"). Use setError from React Hook Form to map the server response to the correct field.
This step is often skipped manually and causes bugs at the seam between client and server validation. Claude Code handles it cleanly because it understands the full form context from its earlier reads.
Step 6: Run tests and verify
Ask Claude Code to run your test suite and fix any breakages:
Run the test suite. Fix any type errors or test failures introduced by the Zod changes. Do not change test expectations unless the old behavior was incorrect.
You can also use the /test slash command to trigger tests directly from within a Claude Code session without leaving the prompt context.
Useful Claude Code slash commands for this workflow
Claude Code's built-in slash commands speed up the validation workflow without extra prompting:
- /review - ask Claude Code to review the generated schema for edge cases before committing.
- /usage - check how many tokens you have consumed so far in the session.
- /clear - reset context between major tasks to avoid context bleed and unnecessary token use.
For complex validation work spanning multiple forms, check out the best Claude Code commands for developers to keep sessions efficient.
Common Zod patterns Claude Code handles well
Claude Code is reliable at generating these Zod schema patterns when prompted clearly:
- Cross-field validation: password and confirm-password match using
z.object().refine(). - Optional fields with default values:
z.string().optional().default("")for non-required inputs. - Union types for conditional fields: shipping address fields that only validate if "ship to different address" is checked.
- Coercion for numeric inputs:
z.coerce.number()for form inputs that arrive as strings. - Enum validation: dropdown values validated against a
z.enum([...])derived from your TypeScript union.
For patterns involving asynchronous validation (checking username availability against an API), use z.string().refine(async (val) => ...) and note that Claude Code may need an extra prompt to wire the async resolver correctly with React Hook Form's mode: "onBlur".
What to watch out for: token usage during long form sessions
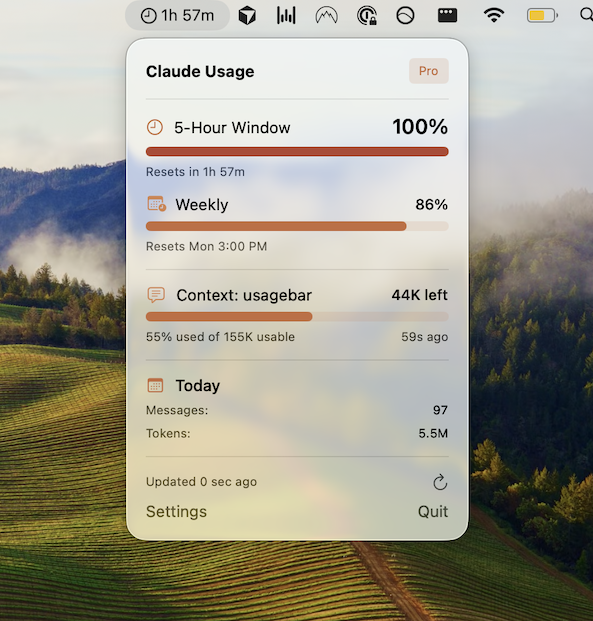
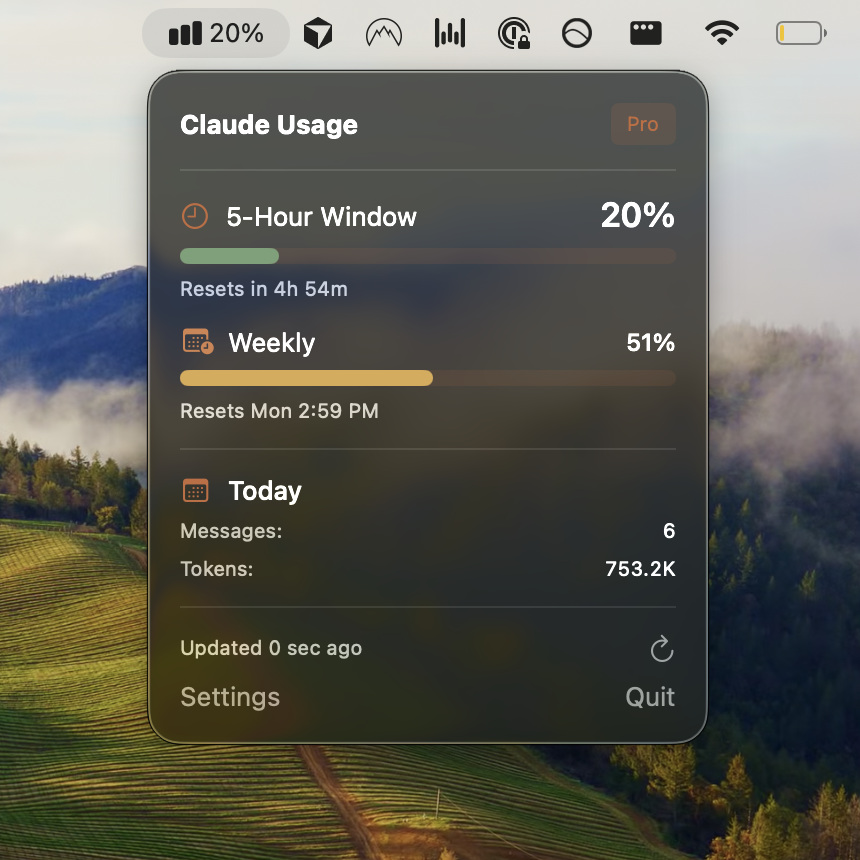
Adding Zod validation across multiple forms in a large codebase is exactly the kind of task that quietly drains your Claude Code usage limit. Each read-edit-test cycle consumes tokens, and if you hit your limit mid-session you face a 5-hour wait before the window resets. That is a brutal interruption when you are wrapping up a PR.
Checking your Claude Code usage limits before starting a long validation task is good practice. Usagebar shows your live usage directly in the macOS menu bar, with alerts at 50%, 75%, and 90% capacity, so you know exactly when to pace yourself or wrap up a session. Credentials are stored securely in macOS Keychain. Pricing is pay-what-you-want, with a free option for students.
You can also run /usage inside Claude Code at any point to see a snapshot of your current consumption, or visit claude.ai/settings/usage for a full breakdown.
For longer projects, see the guide on how to reduce Claude Code token usage to make each session go further.
Key takeaways
- Point Claude Code at a specific form file rather than asking it to "add validation everywhere" -- scoped prompts produce cleaner output.
- Separate your Zod schemas into a
/schemasdirectory so they can be reused on the server side. - Explicitly ask Claude Code to handle server-side error passthrough -- it won't do this by default.
- Use
/clearbetween forms to prevent context bleed from earlier components. - Monitor your usage with Usagebar or
/usageso a 5-hour limit lockout does not interrupt a critical session.
Sources
Track Your Claude Code Usage
Never hit your usage limits unexpectedly. Usagebar lives in your menu bar and shows your 5-hour and weekly limits at a glance.
Get Usagebar